


_edited_edited_edited.png)
Our Living Room Renovation | DIY, Budget friendly | Modern Design
- Aimee Deley
- Aug 21
- 4 min read

Updated: Aug 29
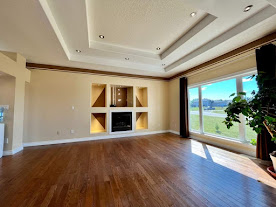
When we first bought the Hazelmere House, the living room was… SO WEIRD. The walls were painted an odd shade of yellow with a thick brown stripe running along the entire main level.
Then there were the strange wall cutouts—too small for a TV, too deep for décor. Honestly, the only purpose they served was being the ultimate hiding spot during hide-and-seek.
And we can’t forget the beam... a giant crossbeam filled with pot lights that forced anyone over 5’10” to duck. Behind that beam was an apartment-sized kitchen, completely cut off from the living room.
Functionality? Zero. Aesthetic? Also zero.
Since I love cooking dinner while watching the Oilers lose in the Stanley Cup finals (a Canadian tradition), we knew we needed to open up the main level. That meant the wall—and the beam—had to go.


Step 1: DIY Living Room Renovation Demo (some might call it free therapy?)
We started with demolition. The wall came down, the beam came down, and so did the flooring.

👉 Why we ripped out the hardwood: don’t come at me with your pitchforks. The hardwood was toast—chipped, patched with tile, and literally gone in places after demo. Also, skinny planks? Not for me. My mom, my aunt, and half the middle-aged women in town disagreed, but here we are. #NoRegrets
We also removed 28 pot lights. Yes, 28. This house was like a lighting museum gone wrong.
💡 Budget tip: When you contract yourself, demo is free—and honestly, it keeps the kids busy??

Step 2: Painting with Benjamin Moore White Dove
After patching and sanding, I primed the brown stripe twice before priming the entire wall for a smooth finish. Then, I painted the main level in White Dove by Benjamin Moore.
✨ Why White Dove? It's the perfect creamy white—warm without being yellow, bright without being stark. It instantly made the space feel bigger, cozier, and modern. Once I started, I couldn't stop! I painted the entire main level in just a few days in between life with 4 kids.
Step 3: Budget-Friendly Flooring
We chose a 12mm commercial-grade laminate in blonde oak from Quality Floors in Grande Prairie. Running it throughout the main level (minus bathrooms) gave the house a seamless, spacious look.
👉 Full tutorial on installing flooring is coming soon—subscribe so you don’t miss it!

Step 4: Lighting & Railing Upgrades
We replaced the pot lights we kept with a highly rated Amazon LED pack (seriously the best bang for your buck). Shop Amazon pot lights here.
The stair railing also got a makeover during our entryway reno: a white oak handrail with iron pickets. (See The Hazelmere House Entryway Renovation here)
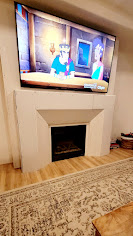
Step 5: The Fireplace Wall Transformation
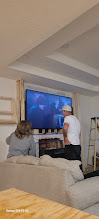
This was the game-changer. To cover the bizarre cutouts and create a proper feature wall, we bumped the TV wall out 16 inches. This also gave us the side wall needed for the arches.
Because the wall moved forward, so did the fireplace. Our Lennox fireplace required a vent extension—which we finally tracked down five hours away in Edmonton. (Yes, we turned it into a family road trip. Renovation life, right?)
DIY Venetian Plaster Fireplace
Kody framed the angled surround, and I finished it with a DIY Venetian plaster from Amazon.
⚠️ Mistake alert: Don’t tint plaster with paint. It cracked and peeled the first time I tried. Round two, I applied it properly and painted it Snowbound by Sherwin Williams.
The result? A clean, minimalist, Mediterranean-inspired fireplace surround that stands out beautifully against the warmer White Dove walls.


Step 6: Building Arched Columns
Let’s just say the arches was “fun”..... We cut slices into drywall every two inches, curved it, screwed it in place and then mud-sand-repeat-shower-dread the next coat- about four times.
Although anytime you involve drywall mud in a project, I instantly hate my life- the result was stunning!! These arched columns became one of my favorite features in the Hazelmere House—and yes, we’re doing them again at The Forever Farm! Stay tuned for the tutorial.
Step 7: DIY Floating Shelves & Cabinets
We built custom floating white oak shelves using 2x4 frames anchored into studs, then wrapped them in oak boards cut at 45° angles.
For the finish:
DIY whitewash (¼ cup white paint + 1 cup water, wiped off)
Stain mix: 1:1 Weathered Oak + Early American
Sealed with clear Verathane
We also built DIY cabinets for hidden storage—perfect for blankets, toys, and board games.
👉 Total cost for shelves + cabinets: $200 in lumber


Step 8: Stone Feature Wall
We finished the fireplace wall with stone from Kakwa Stone. At $800 for stone + mortar, it gave the space a high-end look without blowing the budget.!
We mixed stones by color and shape for a natural finish and had it done in just a few hours.
Step 9: Furnishing & Styling
This is where the cozy factor came in.
Rug: 9x13 from Wayfair (link here)
Couches: 50% off floor models from Urban Barn & HomeSense
Armchairs: HomeSense
Décor: A mix of thrift finds, IKEA plants, and a little “borrowing” from my mom’s collection
Because great style doesn’t ever have to mean overspending. Making cheap look chic, one project at a time.
Total Living Room Renovation Cost
Demo: Free (DIY)
Furniture: $3000
Railing: Already included in entryway reno
TV Wall & Fireplace: $200
Lumber for shelves/cabinets: $200
Stone wall: $800
✅ Total: Just over $4,200
Living Room Before & After
What started as a quirky, cramped space with too many pot lights and awkward cutouts is now an open, modern, Mediterranean-inspired family room—proof that you don’t need a massive budget to create a dream space.


Stay tuned for tutorials on DIY flooring install, building arches, and floating shelves. And don’t forget to subscribe—because if there’s one thing we’ve learned, it’s that every renovation comes with at least one surprise (and usually a family road trip). Your not going to want to miss!

Comments