


_edited_edited_edited.png)
Transforming Our Kitchen: A Budget-Friendly DIY Adventure
- Aimee Deley
- Jul 23
- 5 min read

Updated: Aug 5
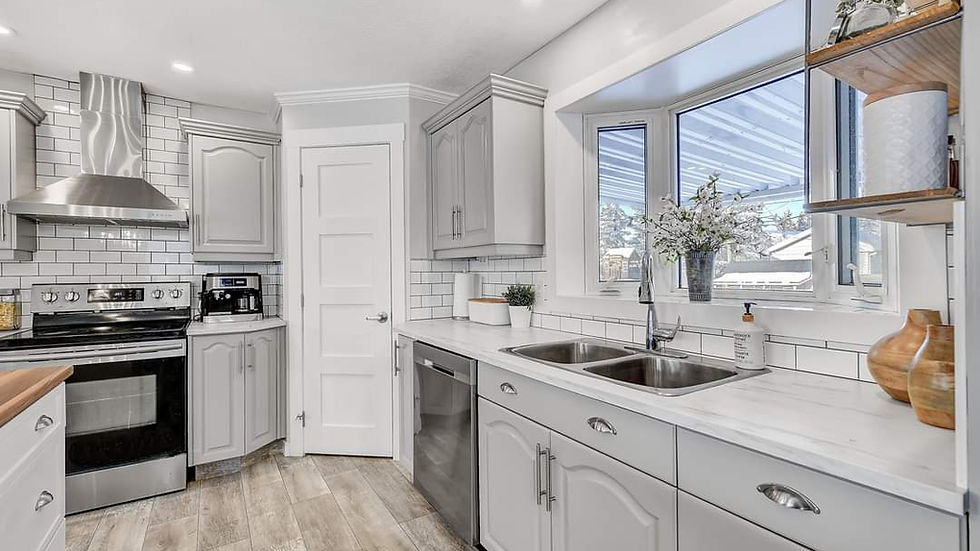
Welcome to the heart of the First Home Flip! When we first walked into this kitchen, it had no real direction—just a mismatch of outdated finishes, clashing colors, and walls that closed everything in. But when you’re a family of six on a tight budget with big dreams and a DIY mindset, you learn to make magic with what you’ve got. This is how we completely transformed our kitchen for under $3,500—with our own two hands, a few thrift finds, and a lot of snack breaks.
🖌️ Step 1: Painting the Cabinets (Yes, Twice!)
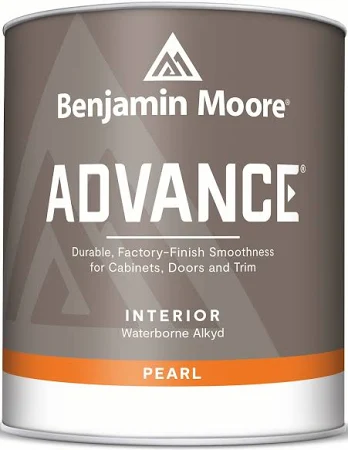
This is where the transformation started—and if you’ve ever painted cabinets while toddlers crawl through your legs and Fruit Loops stick to your socks, you know this is not for the faint of heart. I would like to add that I am sharing the method of rolling on the paint. Why? Well, because I’m clearly a glutton for punishment. I painted these cabinets twice—once with a sprayer and once by hand with a roller. And I’ll be honest… I actually preferred rolling. Shocking, I know!
While spraying can give that smooth, professional finish, the prep work nearly broke me. Taping off every square inch of our kitchen with four kids running around? Not the vibe. Rolling gave me more control, less chaos, and required zero painter’s plastic from floor to ceiling. So here we go—team roller it is!
Materials We Used:
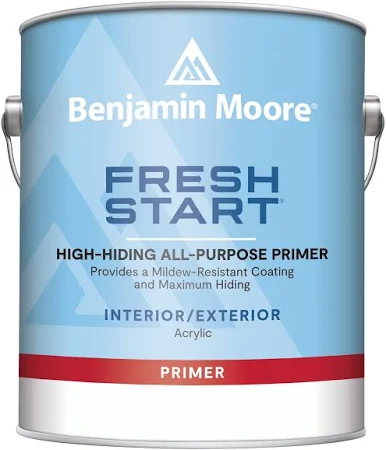
Advance Pearl Paint & Primer by Benjamin Moore
Sandpaper & tack cloth
Brushed nickel pulls & handles from Amazon
How We Did It:
Cleaned every surface with TSP.
Removed and labeled all cabinet doors and hardware, lined them up in the garage, and labeled door fronts. Believe me, this is necessary!
Lightly sanded every inch.
Taped off everything.
Primed cabinets.
Let the primer cure overnight.
Painted the first coat of paint on cabinets, waited 24 hours, then painted the second coat.
Waited 24 hours again, flipped cabinets, and painted two coats while giving 24 hours of dry time in between coats. This process took me about four days.
While the cabinets were drying, I painted all of the kitchen cabinet frames, crown molding, and visible edges. Again, clean, sand, clean, prime, dry, paint, dry, paint.
10. Once everything was dry, now for the fun part!

🪵 Step 2: Budget Countertops with IKEA
We weren’t ready to drop $3k on countertops, so we chose IKEA’s EKBACKEN slabs and added edge banding strips ourselves—with a clothing iron. Yep!
Two slabs of Ekbakken Countertops (IKEA) = $200
Edge banding = $30
A lot of patience and YouTube tutorials = free
Clean, modern, and budget-friendly!
🧱 Step 3: Let’s Talk Tile
When it came to tile, we didn’t overthink it. Classic white subway tile is:
Timeless
Cheap (like, 33¢ a tile cheap)
Straightforward to install
Forgiving for beginners who are also trying to keep toddlers off the counter
No fancy wet saw needed—we used a basic score-and-snap tile cutter, and honestly, it handled everything we needed for a clean, brick-style layout.
Grout Dreams (and Nightmares)
I went with white grout to keep everything looking clean and seamless. The result? A fresh, bright backsplash that didn’t fight with our already bold cabinet color. But then came the Hythe water. If you're local, you already know. If you’re not—just imagine your bright white grout slowly turning the color of old tea. Cute, right?
So what did I do?
I Painted It.
Yes. I literally painted the grout white again using grout paint, and let me tell you, it looked even better than the first time. No re-grouting, no drama, just a tiny brush and a whole lot of stubbornness.
DIY Subway Tile Backsplash (No Tears Edition)
If you're itching to tackle this yourself, here’s how we made it happen.
Materials Used:
3x6 white subway tile (Home Depot)
Pre-mixed tile adhesive
1/16” tile spacers
Notched trowel
Tile cutter (snap style)
White grout
Grout float
Damp sponge
Optional: Grout sealer + grout paint (because… life)
Instructions:
Prep your wall. Clean, dry, and smooth is the goal. Light sand if it’s glossy.
Layout plan. Start from the center and dry-lay your first row so you don’t end up with awkward cuts in the corners.
Adhesive time. Apply with your notched trowel in small sections.
Stick the tiles. Press firmly, use spacers, and double-check that your lines are level every few rows.
Cut as needed. A basic tile cutter is all you need here—score, snap, and celebrate!
Let it dry. At least 24 hours. Walk away. Don’t poke it.
Grout party. Float the grout across the tile at a 45-degree angle. Wipe with a damp sponge as you go.
Seal it (optional). Especially if you have yellow water like we do.
Paint it (if necessary). If you get discoloration, grout paint is your new best friend. It’s fast, easy, and satisfying.
🛠️ Step 4: DIY Island Build for Under $700
Still one of our favorite DIYs to date! We found two bathroom vanities on Facebook Marketplace for $150 total, then:
Painted them to match our cabinets
Built a toe-kick base
Added a Hampton Bay base cabinet from Home Depot
Topped it with a 10-ft walnut slab we scored for $499 at Home Depot (returned by someone—thank you, mystery hero!)
We wrapped the entire base in DIY shiplap (<< click for more DIY shiplap info) and added pendant lighting above. A beautiful focal point and so functional for our family meals and chaos.
🔌 Step 5: New Appliances on a Budget
We saved big by watching sales and using warehouse deals.
Dishwasher – $499 from Costco
Stove – $599 from Costco
Fridge – $799 (twin cooling, City Furniture)
Range Hood – $199 from Home Depot
All clean, simple finishes that elevated the space without breaking the budget. (This renovation was six years ago; prices have fluctuated since.)
💡 Step 6: Walls, Lighting, and Layout
We opened up the kitchen by removing:
The dividing wall between the kitchen and living room
The entry closet (goodbye, weird corner!)
We also said goodbye to the sunshine ceiling (those plastic fluorescent light panels). We patched, retextured, and added pot lights and pendants above the island. I will tag the pot lights we have used time and time again in our renovations! These are high quality, and the price can't be beat! 12 pack 4" pot lights
Island pendant lights? Yes, please! The result? So much more natural light and a far more open concept. I can now watch the kids trash the living room while burning supper. We painted our walls in the majority of The First Home Flip Classic Grey by Benjamin Moore, including the kitchen walls.

✨ Design Vibes
This kitchen was part of what I now call the Grey Era—light grey walls, white cabinetry, matte black finishes, and walnut accents. It felt:
Modern, but warm
Clean & bright
High-end, without the high-end cost
🧮 Budget Breakdown
| Category | Cost |
|-----------------------------------|-----------|
| Cabinet Paint & Supplies | $200 |
| Hardware | $100 |
| IKEA Countertops | $200 |
| DIY Island Build | $700 |
| Appliances | $2,100 |
| Lighting & Fixtures | $200 |
| Misc. Decor & Supplies | $200 |
| Total | $3,500|
🏡 Real Life Renovation, Real Life Budget
This kitchen isn’t just pretty for photos. It’s where our family makes pancakes, prays, dances during cleanup, and drops spaghetti on the floor—daily. This is proof that real-life, budget-friendly home renovations can still feel custom, cozy, and absolutely you.
📸 Want to See the Before & Afters?


Comments