


_edited_edited_edited.png)
The First Home Flip- Laundry Level-Up
- Aimee Deley
- Jul 18
- 4 min read

Updated: Jul 30

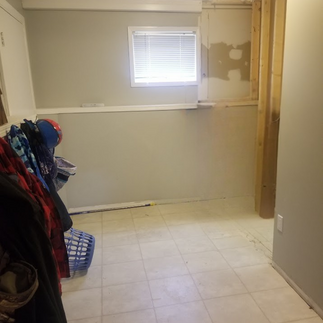
Before we dive into the dreamy “after,” from our laundry room Renovation in The First Home Flip- let’s talk about where we started: crammed under the stairs! How rude! Our washer and dryer were basically living in a Harry Potter cupboard, and folding clothes in that space? Umm, no thank you. I slammed my head off a vent and stubbed my toe on a sewer pipe just trying to switch over a load, so yeah, no thanks. Obviously, we moved some walls, rerouted plumbing (thanks to my favorite handyman, Kody), and gave our laundry zone a full glow-up—on a budget. And yes, I installed more shiplap… because I can’t help myself. If you're wondering how to DIY it like we did, check out my shiplap feature wall tutorial here! It’s a step-by-step for anyone ready to embrace their inner Joanna Gaines (but faster, and with more coffee).


From “Just Deal With It” to “I Might Fold the Towels Today”
This laundry makeover was all about functionality meeting style, without blowing the budget. And spoiler: we did the whole thing for around $2000, including the washer and dryer. Here's how we pulled it off:
The Plan: Steal, Tile, Shiplap, Repeat
We stole space from the adjacent bathroom by taking down the wall, and reframing it 2 ft (the depth of the washer and dryer) in. So thank you bathroom for your generous dontation of space. That gave us just enough wiggle room to stand and sort laundry without slamming face first into a vent. Then Kody, a.k.a. the man who can fix anything, ran all-new plumbing to make the space make sense.
We tiled the floor with the same tile we used in our main bathroom upstairs- classic! We gave one full wall a bold, black shiplap treatment. I know, black—but trust me. It grounded the space and made it feel like less of a utility closet and more like something you might pin on Pinterest. To finish off the festure wall, we added a floating white oak shelf that brought in warmth and gave my plant babies a little sunshine spot.


Storage That Slaps (or at Least Closes)
Here’s where the “smarter not harder” thing really came in: we built a custom folding table that opens up to reveal three hidden laundry bins underneath. One for lights, one for darks, one for “mystery items the kids threw in.” No more baskets all over the floor, no more laundry shame. It's like we Wingardium Leviosa’d our clutter. If you know, you know. Whatsup fellow Harry Potter Fans!
We added an upper IKEA cabinet for detergent and dryer sheets (plus the seventy nine random socks that somehow don’t have matches), ran white subway tile up the back wall to keep it bright and clean-looking, and tied everything in with our home’s palette: white, wood, gray, and a few moody blacks.
Small Space, Big Win
This laundry reno is one of our favorite examples of how you don’t need a massive space—or budget—to make a room work better for your family. We maximized every inch and finally gave laundry the attention it deserved… even if the clothes still sit clean in the dryer for three days. #progress
Want the Details?
🧰 Tools + supplies? Check out The Deley Toolbox Before and afters? They’re waiting on my Instagram page.📬 And if you like small-budget makeovers, real-life chaos, and DIYs that are just the right amount of unhinged—subscribe to The Deley Download, our monthly newsletter. It’s where I share project rundowns, design tips, and the stuff I’m too tired to post anywhere else.
🛠 Tool List for the DIY Laundry Room Makeover:
Here’s what we used to transform the space (or wish we had):
Stud Finder – because guessing is not a structural strategy
Drill/Driver Set – This is a necessity for all DIYers
Tile Cutter or Wet Saw – especially for that subway tile wall
Level – no one likes crooked shiplap, except toddlers
Pin Nailer – for quick and painless shiplap install
Circular Saw – for cutting the oak shelf and laundry table top
Plumbing Tools – Kody’s world (Pex cutter, fittings, etc.)
Caulking Gun + Silicone – finish strong and waterproof
Paint Supplies – brushes, rollers, painter’s tape, etc.
Safety Gear – goggles, gloves, and maybe a prayer
💸 Laundry Room Renovation Cost Breakdown
Item | Description | Cost |
Washer & Dryer | Top Load LG set purchased new (boxing day sale) | $1200 |
Tile & Subway Tile | Floor tile + backsplash subway tile (Home Depot specials, of course) | $250 |
DIY Materials | Includes black shiplap wall, folding laundry table, oak shelf, and hidden hamper system (framing, wood, hardware, paint/stain, etc.) | $300 |
Upper Cabinet (IKEA) | White upper cabinet for storage and aesthetics | $150 |
Plumbing Supplies | PEX pipe, fittings, brackets, and miscellaneous plumbing tools (Kody’s plumbing party) | $100 |
Miscellaneous | Caulk, paint, plant for the shelf (because vibes), drawer pulls, trim | $100 |
✅ Total: $2,100 CAD
You can scale it even further depending on your layout and if you already have some of the tools or scrap materials on hand!


Comments